
Peanut butter jelly time! Peanut butter jelly, peanut butter
jelly, peanut butter jelly and a baseball bat! :D Just kidding! ;) You all
thought that we I was going to teach you how to make the perfect peanut butter
and jelly sandwich. Alas, I am not. I will be teaching you how to make the
basic “Jelly Sandwich (or Sammich, whatever you prefer ;)) Nails” for Day 2 of
the 31 Day Nail Challenge. So welcome to orange nails! You might be wondering
what the heck “Jelly Sandwich” nails are so take a look below. As you can
probably tell, they are just muted glitter nails. This is the first time I’ve
created them myself, but they seem like a great background for other designs or
just great for accent nails when you don’t want too much glitter! So if
interested, let’s get started! (I know, they’re not really the coolest nails
EVER… :/ But they do seem to be trending lately :)

You will need:
- 1 nail polish (any color you want)
- Chunky nail polish glitter (the chunkier, the best for jelly sandwiches. I wouldn’t recommend fine glitter like my Spit Fire by Pure Ice because the texture won’t be the same).
- Clear nail polish (may or may not be used, will explain later)
For orange day, I used this gorgeous orange by OPI called Y’all
Come Back, Ya Hear. It’s a bright orange but not exactly neon. I had to apply 2
coats to get it this color.

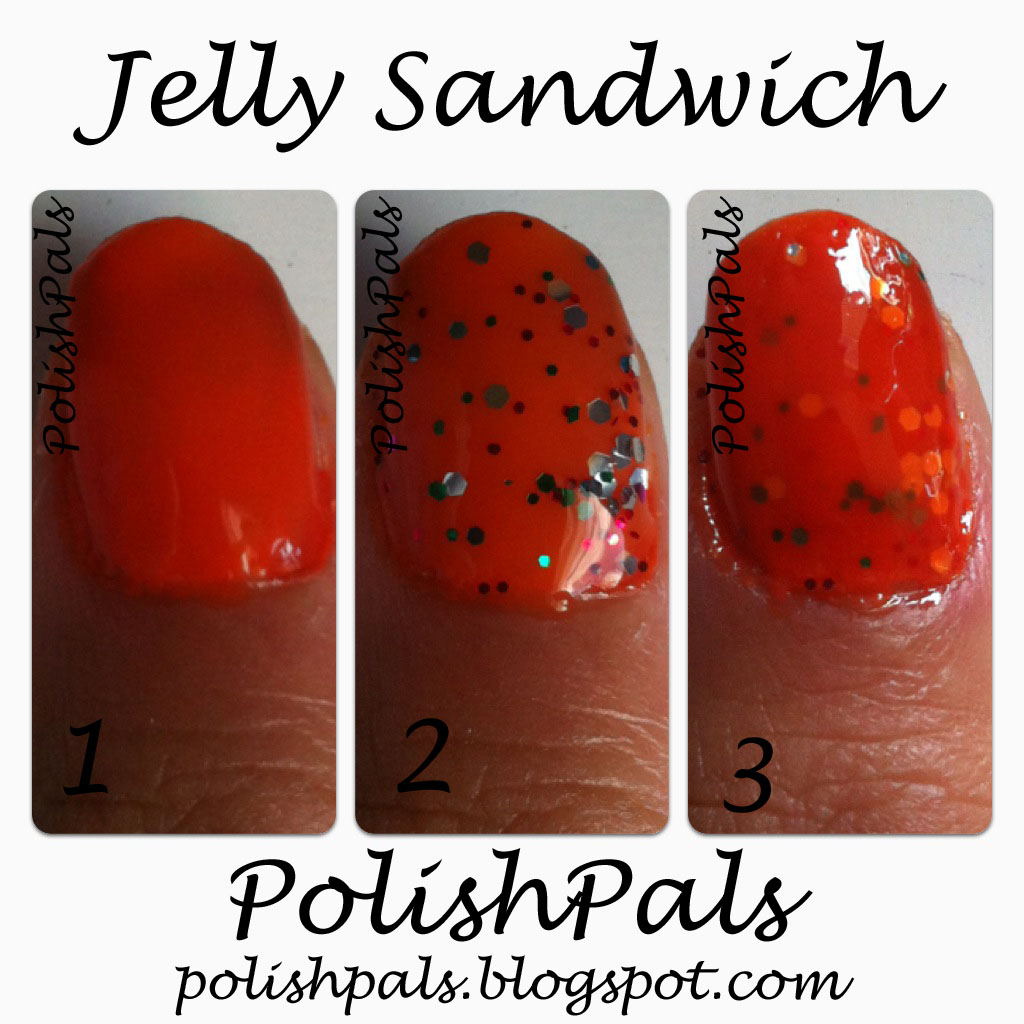
1.
Start off with your base color.
2.
Apply your chunky glitter on top. Let this
glitter dry completely. I used A Party of Five Glitters by Wet n’ Wild and this
is more of a clear coat with some chunky glitter inside so I didn’t have to add
the clear nail polish on top. If your glitter isn’t “smooth” when it’s applied,
then I’d suggest using a quick clear top coat so your jelly sandwich will also
be smooth instead of bumpy. Wait until your clear coat is dried before moving
on once again.
3.
Finally, use the same color nail polish as your
base and apply 1 coat right on top of the sparkles! It’s that easy. :)
I totally understand that this nail design isn’t for
everyone and is kind of weird, but I thought that I’d show you how I did it.
Here are a couple more pictures.

This orange is the same color as my Nike shoe box! :D (I
love my new Nike shoes by the way. They’re black and lime green and SUPER
comfy!)

And I added a matte topcoat to my jelly sammich! My topcoat
is Matte-ly in Love by Hard Candy. This nail polish is only $4 at Walmart. And
what is matte? Matte takes away the shine that nail polish has and makes it
completely “dry” looking. A nice effect to nail polish too if you’re tired of
all the shiny! ;) Matte top coat is like a clear polish that you can apply onto
any nail polish/design and “matte-ify” it.
I hope you all enjoyed learning more about some nail polish
techniques today! Until tomorrow, (yellow nails! :O) Your Polish Pal, Jenna :)
Uh oh… getting rid of the iPhone this next week. :( I better
find my camera charger soon…….! >:( Goodbye to the ease of taking pictures
and just uploading them! :’( Tutorials may not be so easy to create for a while…
especially if I can’t find the charger!

No comments :
Post a Comment