Hey all! I am soooooo sincerely sorry for not posting in over a week. It's been that hectic season of "back to school" (hurray) and all that good stuff. AND to top that off, the new iPhone 5 by Apple is coming out in a month! Exciting! Not if you have to sale your iPhone 4... :/ So, just a forewarning, these tutorials are going to become even harder to create. Yes, I admit I'm lazy and use an iPhone to take all my pictures, but hey! They turn out pretty decent, huh? ;) Anyway! I will unfortunately have to switch to another camera for about a month... So we will see how this goes, but if you only see a couple tutorials for this month of September, please don't worry, I'll make up for it in November! :D Okie doke! Enough of this silly jibber jabber, let's talk about today's mani. :)
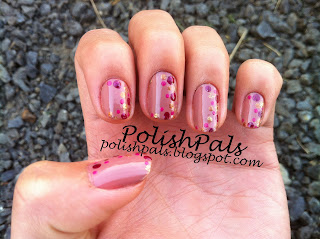
Okay, I'm sure a lot of you guys have seen this very pretty manicure around. Something that you should also know is that it is super easy to create! And NO, you DO NOT need dotting tools. ;) Oh... and sorry about my name - I really don't know what to call this! Dot nails just seemed so boring, so what about a "dotticure"? ;) Love it! And of course there are many, so I tried to be a little more specific and since they "wrap" around your nails, that's what I decided to name them. ;) So take a look below to see the finished product and let's get started! I also decided that because of my "lame" choice of colors that did not like to be photographed at all, I will just do the full picture tutorial instead of the little one with only my thumb nail. :)
I do apologize for the colors I used. In this picture you can't really tell, but in life, they look really cute together! I tried to do a fall color scheme so I chose some golds and pinks/reds.
You will need:
- At least 3 colors - 1 for a base and then however many for your dots
- About 3 different sized dotting tools (I will explain later, don't worry!) Try for a big, medium, and small.
I used Dress Me Up and Harvest Moon by China Glaze and the other 3 I have forgotten and will add later because I'm at my local library using their wifi! :O Hehe.. whoops. *BAD JENNA* :(
So here is Dress Me Up by China Glaze. I just really love this color! It's in between a rose pink (much darker, I know) and a tan color... My mother says it's "mauve". ;) I was like but it's like pink and brown! And yup, she says "mauve". ;)
Start off with your base coat. This will be your background for your dots.
With your big dotting tool, make a few dots around your nail like so. I used my darkest color and only could add 3-4 on my nails. Only add a couple or so because you don't want too much clutter! AHHH! I can't get over one of the most important rules - You can ALWAYS come back and add more. ;)
With your medium dotting tools, follow the same pattern you made the first time and make a couple more dots in a different color! I used a gold :) (which you can't really see... ;/ ) I made about 3-4 again of these medium sized.
Oh guess what? Repeat! :D This time you will use the same medium dotting tool or an even smaller one! Once again, I created 3-5 dots of a different shade of gold/brown.
And finally, add as many small dots in your last color as needed! I used them as "fillers" and since I used a hot pink, it also gave it a lil' spunk. :) I added 6-8 of these. This is also the time to come back and add more dots in whatever size you feel is right. :)
A closeup - You can see the colors a little more clearly :)
Hehe, my nails are the longest they've been in my entire life! Still short, but good, yeah, still good. ;) (Lilo & Stitch, love that movie! :D)
As I promised, I will explain the dotting tools. :) Okay, in another post I mentioned I recently bought dotting tools (eBbay, $4+free shipping) but you don't need these "fancy" tools for these nails! TRUST ME, I used just these simple things you can most likely find around the house for 4 years and created perfectly amazing nail art! So for your big dots, I'd use a sharpened wooden pencil. You can even write on a paper to dull the tip to make it bigger. Then a .7m lead mechanical pencil for medium (you don't even need the lead! The tip works just fine). A .5m lead mechanical pencil for small dots. And finally, if you even want smaller dots, pick up a tooth pick. ;)
Okay, so this concludes are beautiful polka dot nails! (Variation 1, don't be so excited to get done with this first one, there WILL be more, mooohahaha!) These are just one of my favorites because the endless color combinations. :) Have a ton of new nail polish to try out from your recent haul? Yeah, this "dotticure" will help you use them all in one. ;) Until next time, (which is hopefully sooner then a week :( ), you Polish Pal, Jenna =)


No comments :
Post a Comment