Thursday, September 6, 2012

Day 6 - Violet Nails

Yipee yi ya kiyay! :D Howdy partners, I got you some blingy violet nails today. Oh, and a dandy tutorial that will make the difference of life or death. Can ya all give me a whoop? *WHOOP!!!* Thank ya all kindly. ;) Okay, hope you were reading this in a nice “Western” accent because I’m done. xD So I give you my violet nails for the 31 Day Nail Challenge! My base color is Prince Street by NYC and the top coat is that gorgeous sparkle called Sugar Plum Fairies Gone Wild by Sephora. Okay, I am going to keep this super short and sweet because I’ll be creating my tutorial in another post. Oh yeah, it’s on how to get glitter nail polish off in 5 minutes or less. ;) It’s a life saver! So in about 30 minutes… check in then!Your Polish Pal Jenna signing out! ;) 

Love this glitter polish!

Pretty purple combo ;)

Wednesday, September 5, 2012

Day 5 - Blue Nails

Woaaaah! Today was a super busy day! And that is my only explanation for my simple nails. :) I finished these in 10 minutes, so if I’m lazy and refuse to make another creative today, I know that you can make cute polka dot nails too. ;) So say hello to day 5 which are blue nails! My base coat is a light baby blue called I Need A Re-Freshmint by Wet n’ Wild and the white dots are Superstar by Pure Ice.

I like this picture ;) 
The classic rocks! I don't know what I'm going to do when it's winter and there is snow... :( Move the snow and melt the ice and STILL get awesome rock pictures maybe? ;) Just kidding!

And I unfortunately will be selling the iPhone in a couple days… Ordered the box to ship it off today. :/ Can’t wait to get the iPad though. ;) I wonder how I will take pictures on that thing though. xD So, I will prepare a few days of this challenge in advance, but I won’t post them of course until I was supposed to. I just don’t know when I’ll have a camera again because I still can’t find that Canon charger. Grrr… Oh well. Tomorrow will have a VERY, VERY useful tip and tutorial. ;) Please check on by if you want to learn a secret that will change your life FOREVER. xD Errrrrr, not your life - your experience with painting your nails. ;) So stay tuned for the purple nails! :D Until next time, Your Polish Pal, Jenna :]

Tuesday, September 4, 2012

Day 4 - Green Nails & Gradient Dot Tutorial

Hey girls! I was able to create for you another one of those adorable "dotticure" tutorials today! This time I made a gradient dot nails with different colors. Just in case you look at the photos and are like "Woah there Jenna, what are you talking about?!?! This ain't no gradient dot nail," you're probably right. ;) There are many versions of gradient dots, but the one I'm trying to showcase today has many polka dots of different sizes and colors. So go ahead and look below at our finished look. :) I used all green shades in honor of our challenge. ;) So let's get started!

You will need:
  • At least 2 different colors
  • Dotting tools of various sizes; small, medium, and large (click HERE to see what you can use if you don't have dotting tools - This is my other dotticure tutorial).
These are the colors I used are Gaga Green and Agro by China Glaze. a lime green glow in the dark nail polish by Love & Beauty (from Forever 21, name unknown), SaGreen the Teenage Witch by Wet n' Wild, and MY FAVORITE, Mint Sorbet by Sally Hansen.
 
And before we even get started, I LOOOOOOOVE this mint (sea foam if you must) green! I've seen this polish on so many other people, and I finally decided to buy it. One of my favorite colors. :) It's a little bit more green in real life too. ;)
 
Let's get started!
1. Paint your base coat.
2. Start with your largest dotting tool, and make a couple large dots at the tip of your nail.
3. With your medium dotting tool and make a few more dots but don't start at the tip. Look below and see how I started them around the area that my big dots ended.
4. Continue this process essentially with as many colors or as few as you want. You can make them busy like mine or quite subtle.
 
 
Okay, I know you guys are thinking "Those were terrible instructions!" And they were, for a reason. ;) I do believe that you can't make tutorials for dotticures. I mean honestly, dot manis are totally all your work. So just see what looks best and I'm here just to give you some ideas and pictures on how I did mine. But YOU and YOUR nails are a whole other story. ;) Let's see how I did mine. xD 

My gorgeous base color <3
Starting out with a few chunkers ;)
Adding medium sized dots
Added that neon glow-in-the-dark nail polish.
And my friend didn't really like the last metallic green dots... He said they looked funny haha! Well too bad. ;)  
Green grass and green nails ;)
 
As you can see, my gradient dot (dot gradient..? Hmm...) mani has multiple colors. I've seen other that use the same technique of changing the dot sizes but only using 1 color for the dots the entire time. That's why I say you only need 2 colors. ;) Oh, and yes, the glow in the dark nail polish really does work. xD I got it for $2.80 from Forever 21 (a clothes department store) and it's glows really well if it's been in the light. (Just stick it on top of a light bulb or lamp that's on hehe). The formula is sort of gross though - too gunky and peels off really easily... I just wanted glowing nails polish though haha! This concludes our 4th day of our 31 Day Nail Challenge. Hope to catch ya tomorrow! Until then, Your Polish Pal, Jenna :]
Before I go, say hello to Mr. Green Bunny. Yes, that's his name. ;) I've had him since I was born hehe and he's a pretty cute fellow! Do you have a toy that you've had for just about... forever? ;) Just wanted to conclude with him, so I hope you all have a nice day! 

Monday, September 3, 2012

Day 3 - Yellow Nails

Three days down, twenty seven days to go. ;) So as you guess, today is yellow nails! I really don’t like this theme… and you can tell in my choice of nail art today. They’re just plain old cheetah nails. I realized, since I’m not doing as many tutorials (considering I will be blogging everyday hopefully hehe), you’ll probably get to know me a little better! :) This month, it’s going to get a lot more personal. ;) Okay, let’s get back to the nails! And I’ll be trying to add some technique tutorials as well, not just nail art.
I am wearing Lexington Yellow by NYC. It’s one of my 2 yellows in my nail polish collection (Would you believe me if I said I only have about 60 nail polishes? Yup, that’s all.) but it’s a really medium yellow. There is no glitter or metallic-ness in this color unlike my other yellow called Excuse Me by Pure Ice which is more metallic. So I give you yellow nails with gold cheetah print! Just in case you want to learn how to make your own cheetah nails, I made a tutorial about a month ago. So go ahead and click HERE if interested. :)
 
The gold spots are The Gold and The Beautiful by Wet n’ Wild and the black is Smoke and Ashes by China Glaze. :) Oh, and I made this entire design with just a mechanical pencil while dipping it into nail polish. ;) No fancy tools here!
And I just really like this picture :)
 
Okay, get ready for some awesome green nails tomorrow! Catch y’all then! Your Polish Pal, Jenna =)


Sunday, September 2, 2012

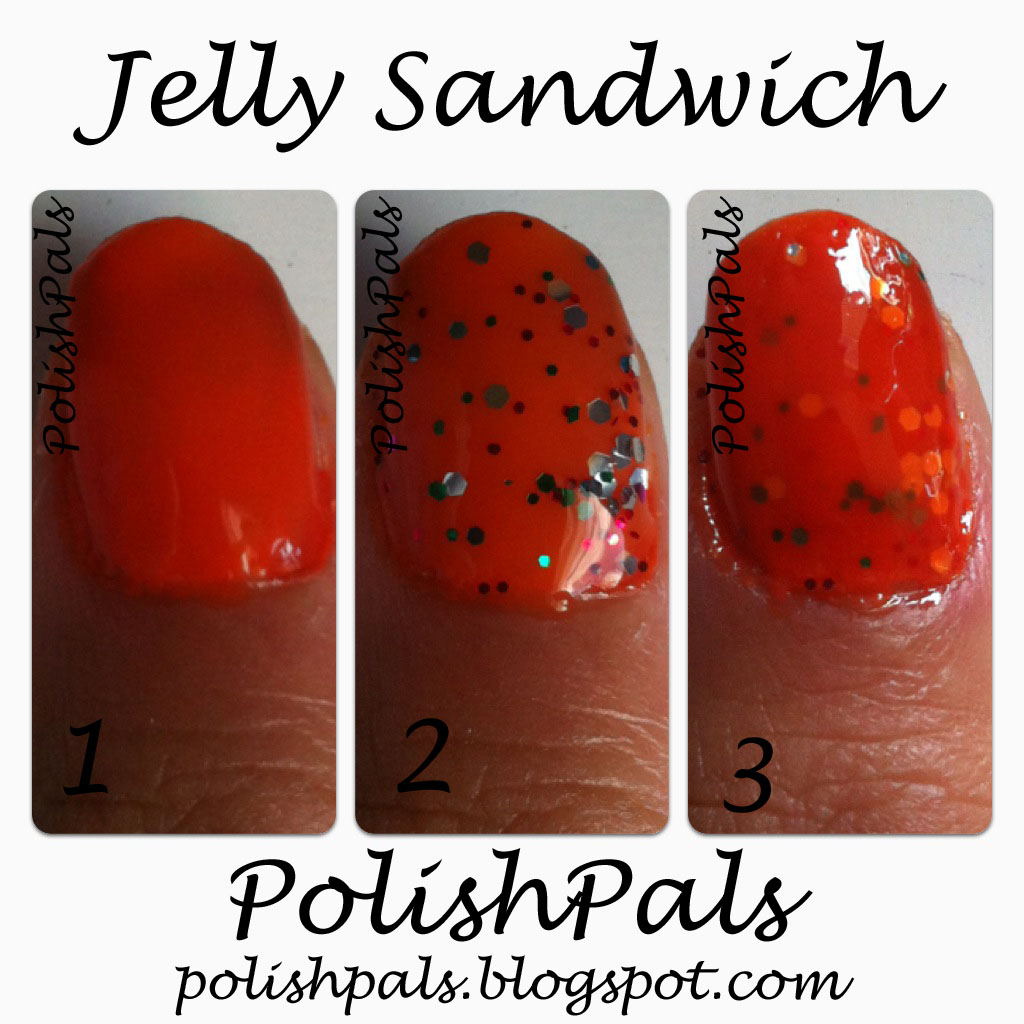
Day 2 - Orange Nails and Jelly Sandwich Tutorial


Peanut butter jelly time! Peanut butter jelly, peanut butter jelly, peanut butter jelly and a baseball bat! :D Just kidding! ;) You all thought that we I was going to teach you how to make the perfect peanut butter and jelly sandwich. Alas, I am not. I will be teaching you how to make the basic “Jelly Sandwich (or Sammich, whatever you prefer ;)) Nails” for Day 2 of the 31 Day Nail Challenge. So welcome to orange nails! You might be wondering what the heck “Jelly Sandwich” nails are so take a look below. As you can probably tell, they are just muted glitter nails. This is the first time I’ve created them myself, but they seem like a great background for other designs or just great for accent nails when you don’t want too much glitter! So if interested, let’s get started! (I know, they’re not really the coolest nails EVER… :/ But they do seem to be trending lately :)
You will need:
  • 1 nail polish (any color you want)
  • Chunky nail polish glitter (the chunkier, the best for jelly sandwiches. I wouldn’t recommend fine glitter like my Spit Fire by Pure Ice because the texture won’t be the same).
  • Clear nail polish (may or may not be used, will explain later)
For orange day, I used this gorgeous orange by OPI called Y’all Come Back, Ya Hear. It’s a bright orange but not exactly neon. I had to apply 2 coats to get it this color.  

1.       Start off with your base color.
2.       Apply your chunky glitter on top. Let this glitter dry completely. I used A Party of Five Glitters by Wet n’ Wild and this is more of a clear coat with some chunky glitter inside so I didn’t have to add the clear nail polish on top. If your glitter isn’t “smooth” when it’s applied, then I’d suggest using a quick clear top coat so your jelly sandwich will also be smooth instead of bumpy. Wait until your clear coat is dried before moving on once again.
3.       Finally, use the same color nail polish as your base and apply 1 coat right on top of the sparkles! It’s that easy. :)
I totally understand that this nail design isn’t for everyone and is kind of weird, but I thought that I’d show you how I did it. Here are a couple more pictures.
This orange is the same color as my Nike shoe box! :D (I love my new Nike shoes by the way. They’re black and lime green and SUPER comfy!)
And I added a matte topcoat to my jelly sammich! My topcoat is Matte-ly in Love by Hard Candy. This nail polish is only $4 at Walmart. And what is matte? Matte takes away the shine that nail polish has and makes it completely “dry” looking. A nice effect to nail polish too if you’re tired of all the shiny! ;) Matte top coat is like a clear polish that you can apply onto any nail polish/design and “matte-ify” it.
I hope you all enjoyed learning more about some nail polish techniques today! Until tomorrow, (yellow nails! :O) Your Polish Pal, Jenna :)
Uh oh… getting rid of the iPhone this next week. :( I better find my camera charger soon…….! >:( Goodbye to the ease of taking pictures and just uploading them! :’( Tutorials may not be so easy to create for a while… especially if I can’t find the charger!

Saturday, September 1, 2012

31 Day Nail Challenge! Day 1 - Red Nails

Hey you all! Happy 1st of September! I am going to try to complete something new this month - I will be part of the 31 Nail Day Challenge which means I will have to have 31 new designs every day according to THIS chart. ;) I unfortunately will not be able to create a tutorial for each day, but don't fret! I will create them at another time. :) So and since it's September (30 days has September, April, June and November, all the rest have 31 except for February which has 28 days clear and 29 in leap year. ;) Hehe!), I will have to do 2 one of the days. :) Hope you guys don't mind! And if you have any suggestions, questions, or comments, feel free to email me or contact me on Instagram. Okay, so let's see what I came up for day 1: red nails.

 
And I give you, Day 1 of the 31 Day Challenge
 
I am wearing Poinsettia by China Glaze :)

Decided on an eye-catching red chevron manicure

Used 2 pieces of scotch tape to create a triangle and filled it in with a Smoke and Ashes by China Glaze

Repeated the last step on top of the black, but this time I used Spit Fire by Pure Ice.

And here is the chevron manicure in the sun! :)
 
Sorry for not having a tutorial. I did attempt to create one, but the lighting just wasn't to my satisfaction. Hmm.. stay tuned to see orange nails tomorrow! :D Your Polish Pal, Jenna :) I challenge you do complete this too with me. ;) Lemme know if you're doing this! I'd love to see your results!
 

Friday, August 31, 2012

Wrap Around Dots: "Dotticure" #1

Hey all! I am soooooo sincerely sorry for not posting in over a week. It's been that hectic season of "back to school" (hurray) and all that good stuff. AND to top that off, the new iPhone 5 by Apple is coming out in a month! Exciting! Not if you have to sale your iPhone 4... :/ So, just a forewarning, these tutorials are going to become even harder to create. Yes, I admit I'm lazy and use an iPhone to take all my pictures, but hey! They turn out pretty decent, huh? ;) Anyway! I will unfortunately have to switch to another camera for about a month... So we will see how this goes, but if you only see a couple tutorials for this month of September, please don't worry, I'll make up for it in November! :D Okie doke! Enough of this silly jibber jabber, let's talk about today's mani. :)
 
Okay, I'm sure a lot of you guys have seen this very pretty manicure around. Something that you should also know is that it is super easy to create! And NO, you DO NOT need dotting tools. ;) Oh... and sorry about my name - I really don't know what to call this! Dot nails just seemed so boring, so what about a "dotticure"? ;) Love it! And of course there are many, so I tried to be a little more specific and since they "wrap" around your nails, that's what I decided to name them. ;) So take a look below to see the finished product and let's get started! I also decided that because of my "lame" choice of colors that did not like to be photographed at all, I will just do the full picture tutorial instead of the little one with only my thumb nail. :)
 
 
I do apologize for the colors I used. In this picture you can't really tell, but in life, they look really cute together! I tried to do a fall color scheme so I chose some golds and pinks/reds.
 
You will need:
  • At least 3 colors - 1 for a base and then however many for your dots
  • About 3 different sized dotting tools (I will explain later, don't worry!) Try for a big, medium, and small.
I used Dress Me Up and Harvest Moon by China Glaze and the other 3 I have forgotten and will add later because I'm at my local library using their wifi! :O Hehe.. whoops. *BAD JENNA* :( 
 

So here is Dress Me Up by China Glaze. I just really love this color! It's in between a rose pink (much darker, I know) and a tan color... My mother says it's "mauve". ;) I was like but it's like pink and brown! And yup, she says "mauve". ;)

Start off with your base coat. This will be your background for your dots.

With your big dotting tool, make a few dots around your nail like so. I used my darkest color and only could add 3-4 on my nails. Only add a couple or so because you don't want too much clutter! AHHH! I can't get over one of the most important rules - You can ALWAYS come back and add more. ;)

With your medium dotting tools, follow the same pattern you made the first time and make a couple more dots in a different color! I used a gold :) (which you can't really see... ;/ ) I made about 3-4 again of these medium sized.

Oh guess what? Repeat! :D This time you will use the same medium dotting tool or an even smaller one! Once again, I created 3-5 dots of a different shade of gold/brown.

And finally, add as many small dots in your last color as needed! I used them as "fillers" and since I used a hot pink, it also gave it a lil' spunk. :) I added 6-8 of these. This is also the time to come back and add more dots in whatever size you feel is right. :)

A closeup - You can see the colors a little more clearly :)
 
Hehe, my nails are the longest they've been in my entire life! Still short, but good, yeah, still good. ;) (Lilo & Stitch, love that movie! :D)

As I promised, I will explain the dotting tools. :) Okay, in another post I mentioned I recently bought dotting tools (eBbay, $4+free shipping) but you don't need these "fancy" tools for these nails! TRUST ME, I used just these simple things you can most likely find around the house for 4 years and created perfectly amazing nail art! So for your big dots, I'd use a sharpened wooden pencil. You can even write on a paper to dull the tip to make it bigger. Then a .7m lead mechanical pencil for medium (you don't even need the lead! The tip works just fine). A .5m lead mechanical pencil for small dots. And finally, if you even want smaller dots, pick up a tooth pick. ;)
 
Okay, so this concludes are beautiful polka dot nails! (Variation 1, don't be so excited to get done with this first one, there WILL be more, mooohahaha!) These are just one of my favorites because the endless color combinations. :) Have a ton of new nail polish to try out from your recent haul? Yeah, this "dotticure" will help you use them all in one. ;) Until next time, (which is hopefully sooner then a week :( ), you Polish Pal, Jenna =)