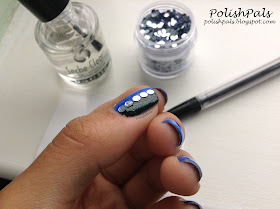
Hey there! Have you ever had chunky craft glitter just laying around the house that you rarely use??! Yeah. That's me. Right here. But do you also love cute nails? Yup. You've come to the right spot. Today I'm going to show you an awesome way to use up some of that loose glitter to add to your nails and it's totally going to spice up any look! So let's get started. ;)
Here is just one example of how your nails could look like
when you're done! The possibilities of this technique are endless :) So keep
reading if you're interested!
Here is what you need for glitter placement nails: Clear
nail polish, scrap paper, a pencil (or a toothpick, dotting tool, etc., to pick
up the glitter), and obviously... LOOSE CHUNKY GLITTER! :D The glitter I'm
using in this tutorial is from KKCenterHK.com and you can find the exact
glitter I used HERE.
Stay tuned for tomorrow's review on these babies! ;)
First, place just a few glitters on your scrap piece of
paper. Then drop some of that clear polish onto that paper too! Make sure it
doesn't leak through the paper!!
Now dip your pencil/toothpick/dotting into the clear polish.
You just need to coat the tip so we can grab some glitter.
Now go for that glitter! :D Since the end of your pencil
should be coated, all you need to do is touch the top of the glitter and it
should stick. Now... how to get it onto your nail...?
Easy. BARELY dip that glitter on the end of you pencil into
the clear polish again to coat the other side.
I already have an example of how I decided to use my glitter
placement this time. XD I had a blue base, added some black for a
"Sideways French Tip", but still wanted some pizazz so I added some
glitter. ;) And you guessed it! Just set the loose glitter right on top of your
nail.
Like so... :) Repeat this process as many times as you want
until you have your glittered-out nails exactly the way you want them! Of
course you can tell I just made glitter lines but what else can you do with
this technique? Use the glitter for random polka dots all of your nail! Or to
accent things like flower centers. :) This is one of my first glitter
placements so I'm still practicing myself but seriously. Glitter placement
manis are so fun!
Well, after you're
done with your design, just add a clear topcoat ALL OVER your nail are you are
ready to sport your new nails! :) And to remove the glitter, just use acetone
and a cotton ball to rub off the design like you would to any nail polish. XD The
glitter should NOT come off in water or the shower if you put a clear topcoat
one. I've had these nails on for 2 days and the glitter haven't come off yet!
I hope you enjoyed
today's tutorial and come back tomorrow to see how my entire manicure turned out
AND my review on these little silver
glitters I received from HHCenterHK.com!
Your Polish Pal,
Jenna


A mechanical pencil... get out of town! That's so clever!! I'll definitely be trying this :)
ReplyDeleteHehe thanks girl! I've ALWAYS used a mechanical pencil for all my nail art. Never that silly toothpick idea. :/ It's just so unnatural. xD
DeleteGreat idea with the pencil. I have been using one of those "white pencil" looking sticks. It does not always do the job right. Now as far as the glitter, I am doing this for sure. It is SIMPLE ELEGANCE and very beautiful
ReplyDelete